How to Create a Telegram Bot with Spring Boot

Introduction
Telegram is a cloud-based, cross-platform social media and instant messaging (IM) service launched on iOS on August 14, 2013, and Android on October 20, 2013. With Telegram, users can exchange messages, share media and files, hold private and group voice or video calls, and even host public livestreams.
One unique feature of Telegram is its bots — automated applications that operate within the messaging platform. These bots interact with users to automate tasks or provide information on demand. Users can communicate with bots by sending specific commands or messages, and the bots respond accordingly.
Commands must always start with the
/symbol and contain up to 32 characters. They can use Latin letters, numbers and underscores, though simple lowercase text is recommended for a cleaner look.
Creating a Telegram Bot

To create a Telegram bot, start by messaging @BotFather, the official bot management tool on Telegram. Type the command /newbot to initiate the setup. BotFather will guide you through the steps, beginning with choosing a name for your bot. Here’s a sample conversation with @BotFather.

Lets Code
First, let’s create a configuration class responsible for registering our bot:
@Configuration
@Getter
public class TelegramBotConfig {

 @Bean
 public DefaultBotOptions defaultBotOptions() {
  return new DefaultBotOptions();
 }

 @Bean
 public TelegramBotsApi telegramBotsApi(TelegramBot bot) throws TelegramApiException {
  TelegramBotsApi telegramBotsApi = new TelegramBotsApi(DefaultBotSession.class);
  telegramBotsApi.registerBot(bot);
  return telegramBotsApi;
 }
}
Next, create a component that defines the bot’s behaviour in response to specific commands. Here’s an example component where we define a few commands and configure actions in the onUpdateReceived method:
@Component
public class TelegramBot extends TelegramLongPollingBot {
private static final Logger logger = LoggerFactory.getLogger(TelegramBot.class);
private static final List<BotCommandInfo> commandInfos = List.of(
new BotCommandInfo("/start", "Greets and recommends help command", "Start"),
new BotCommandInfo("/start_with_reply", "Starts the bot with reply keyboard", "Start with Reply"),
new BotCommandInfo("/hello", "Simple greeter", "Hello"),
new BotCommandInfo("/help", "Shows available commands", "Help"),
new BotCommandInfo("/joke", "Tells a random joke", "Tell me a joke"),
new BotCommandInfo("/name_surname", "Shows your name and surname", "Name Surname"),
new BotCommandInfo("/chat_id", "Shows your chat id", "Chat ID")
);
private final String botUsername;
public TelegramBot(@Value("${telegram.bot.username}") String botUsername,
@Value("${telegram.bot.token}") String botToken,
DefaultBotOptions options) {
super(options, botToken);
this.botUsername = botUsername;
try {
List<BotCommand> commands = commandInfos.stream()
.map(info -> new BotCommand(info.command(), info.description()))
.toList();
this.execute(new SetMyCommands(commands, new BotCommandScopeDefault(), null));
} catch (TelegramApiException e) {
logger.error("Failed to set bot commands: {}", e.getMessage());
}
}
@Override
public String getBotUsername() {
return botUsername;
}
@Override
public void onUpdateReceived(Update update) {
if (update.hasMessage() && update.getMessage().hasText()) {
String chatId = update.getMessage().getChatId().toString();
String receivedMessage = update.getMessage().getText();
String username = String.format("%s %s",
update.getMessage().getFrom().getFirstName(),
update.getMessage().getFrom().getLastName());
handleCommands(chatId, receivedMessage, username);
} else if (update.hasCallbackQuery()) {
CallbackQuery callbackQuery = update.getCallbackQuery();
String username = String.format("%s %s",
callbackQuery.getFrom().getFirstName(),
callbackQuery.getFrom().getLastName());
String callbackData = callbackQuery.getData();
String chatId = callbackQuery.getMessage().getChatId().toString();
handleCallbackQuery(callbackData, chatId, username);
}
}
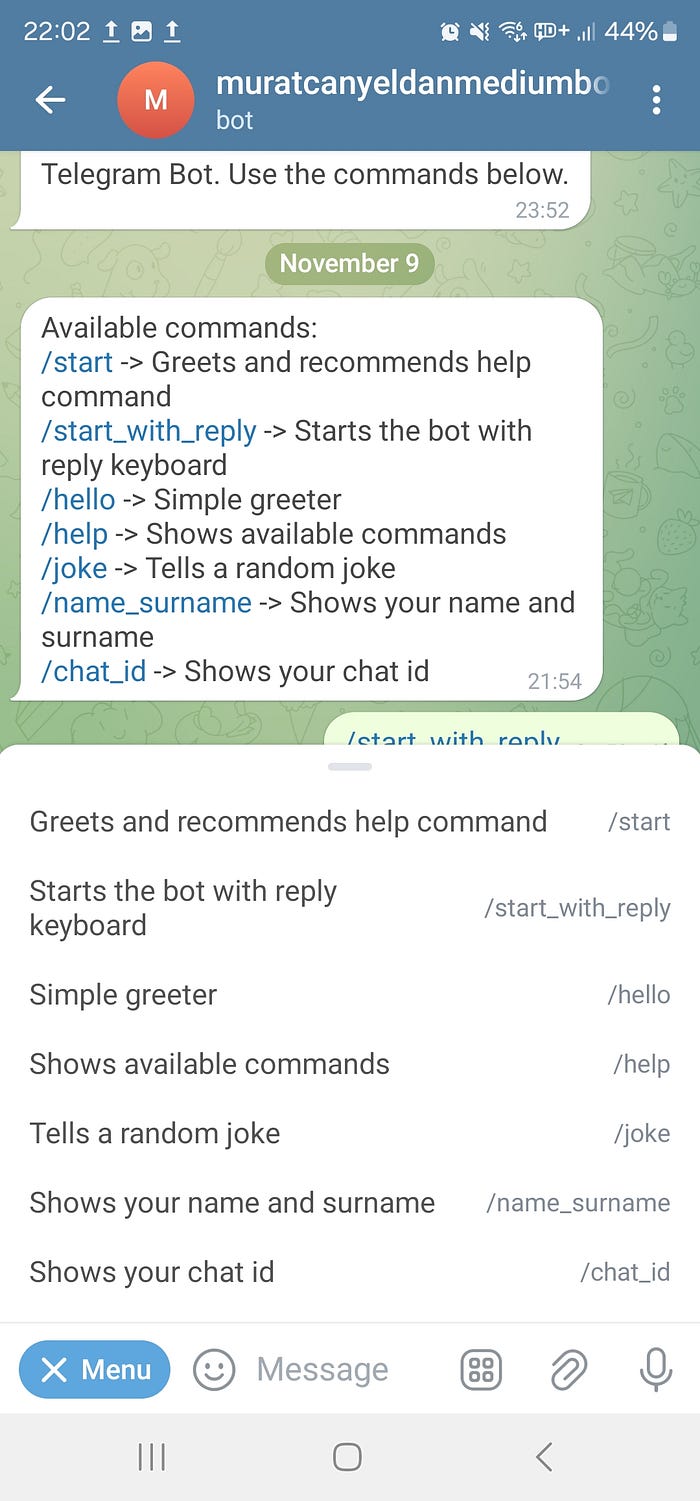
}To inform users of available commands, you can set bot commands and display them in the bot’s menu:
List<BotCommand> commands = commandInfos.stream()
     .map(info -> new BotCommand(info.command(), info.description()))
     .toList();
   this.execute(new SetMyCommands(commands, new BotCommandScopeDefault(), null));
With these commands set, they’ll appear like this in the bot interface:
One of the input option is accept free input from users, with this bot recognizes certain commands and acts accordingly to it. Here is an example code of how the bot recognizes pre-defined commands.
private void handleCommands(String chatId, String receivedMessage, String username) {

  String messageText = receivedMessage.trim();

  Optional<String> optionalCommand = commandInfos.stream()
    .filter(info -> info.label().equalsIgnoreCase(messageText))
    .map(BotCommandInfo::command)
    .findFirst();

  String commandKey;

  if (optionalCommand.isPresent()) {
   commandKey = optionalCommand.get().toLowerCase();
  } else if (messageText.startsWith("/")) {
   commandKey = messageText.split(" ")[0].toLowerCase();
  } else {
   commandKey = messageText.toLowerCase();
  }

  Map<String, Runnable> commandHandlers = Map.of(
    "/start", () -> handleStartCommand(chatId, username),
    "/start_with_reply", () -> handleStartWithReplyCommand(chatId, username),
    "/hello", () -> handleHelloCommand(chatId, username),
    "/joke", () -> handleJokeCommand(chatId),
    "/name_surname", () -> handleNameSurnameCommand(chatId, username),
    "/help", () -> handleHelpCommand(chatId),
    "/chat_id", () -> sendMessage(chatId, chatId)
  );

  commandHandlers.getOrDefault(commandKey, () -> handleUnknownCommand(chatId))
    .run();
 }
When a user sends the /start command, the bot executes the following code, sending a welcome message:
private void handleStartCommand(String chatId, String username) {
  String message = String.format("Hello %s! Welcome to the Telegram Bot. Choose an option:", username);
  sendMessage(chatId, message, getInlineKeyboard());
 }
Bots are able to interpret free text input from users, but offering specific suggestions is often more intuitive — this is where custom keyboards can be extremely useful. Here’s how you can implement a custom keyboard with two rows, each containing two options:
private ReplyKeyboardMarkup getCommandKeyboard() {
  ReplyKeyboardMarkup keyboardMarkup = new ReplyKeyboardMarkup();
  keyboardMarkup.setResizeKeyboard(true);

  List<KeyboardRow> keyboard = new ArrayList<>();

  KeyboardRow firstRow = new KeyboardRow();
  firstRow.add("Start");
  firstRow.add("Help");
  keyboard.add(firstRow);

  KeyboardRow secondRow = new KeyboardRow();
  secondRow.add("Hello");
  secondRow.add("Tell me a joke");
  keyboard.add(secondRow);

  keyboardMarkup.setKeyboard(keyboard);
  return keyboardMarkup;
 }
Here’s how it will appear in your bot.

When Tell me a joke is selected, a message is sent to the bot and the bot responds according to that.

There are times when you’d prefer to do things without sending any messages to the chat — like when a user is changing settings, toggling options or navigating search results. In such cases, you can use Inline Keyboards that are shown directly below their relevant messages.
Unlike with custom reply keyboards, pressing buttons on inline keyboards doesn’t send messages to the chat. Instead, inline keyboards support buttons that can work behind the scenes or open different interfaces.
private InlineKeyboardMarkup getInlineKeyboard() {
  InlineKeyboardMarkup inlineKeyboardMarkup = new InlineKeyboardMarkup();

  InlineKeyboardButton jokeButton = new InlineKeyboardButton();
  jokeButton.setText("Another Joke");
  jokeButton.setCallbackData("another_joke");

  InlineKeyboardButton helloButton = new InlineKeyboardButton();
  helloButton.setText("Say Hello");
  helloButton.setCallbackData("hello_callback");

  InlineKeyboardButton helpButton = new InlineKeyboardButton();
  helpButton.setText("Help");
  helpButton.setCallbackData("help_callback");
  helpButton.setUrl("https://muratcanyeldan.com/");

  List<InlineKeyboardButton> rowInline = new ArrayList<>();
  rowInline.add(helloButton);
  rowInline.add(helpButton);
  rowInline.add(jokeButton);

  List<List<InlineKeyboardButton>> rowsInline = new ArrayList<>();
  rowsInline.add(rowInline);

  inlineKeyboardMarkup.setKeyboard(rowsInline);

  return inlineKeyboardMarkup;
 }
Here’s how it will appear in your bot.
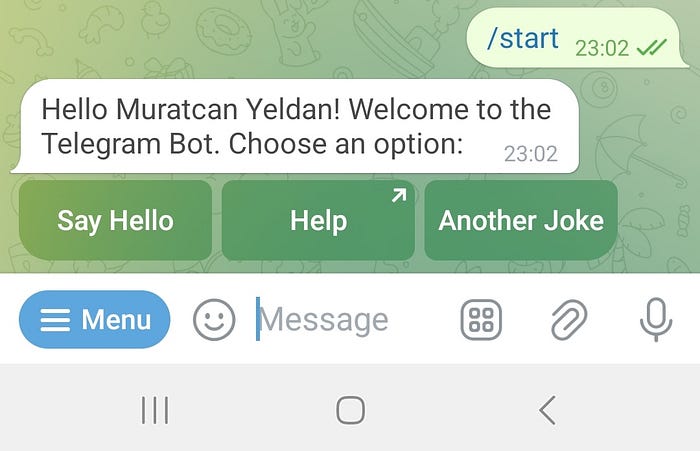
When Another Joke is selected, the bot processes it without sending a message, acting according to the callback.

By defining a URL to the inline keyboard button you can create a redirect to the selected URL.
InlineKeyboardButton helpButton = new InlineKeyboardButton();
  helpButton.setText("Help");
  helpButton.setCallbackData("help_callback");
  helpButton.setUrl("https://muratcanyeldan.com/");
As shown, the Telegram Bot API offers many features to suit various needs. For further information, you can review the official Telegram Bot API documentation.
You can find my example project here.
Thank you for reading, and happy coding!